How to make a Rosette
In my last post, I said I was going to show a tutorial on how I save money making my own rosettes.
Normaly rosettes are approx 3 1/2" x 3 1/2" x 1". Normaly I glue up two layers of 3/4" poplar and plane them down to 1" thick, but you could glue up a 1/2" and a 3/4" pieces of (insert your choice of wood that can be stained or painted here" After the glue-up is complete and out of your clamps, I draw a line 3 1/2" parallel from the long edge as a refrence point and then true up an edge with my jointer. If you are using stock from your local big box store, and not rough lumber you can skip that step.

Normaly rosettes are approx 3 1/2" x 3 1/2" x 1". Normaly I glue up two layers of 3/4" poplar and plane them down to 1" thick, but you could glue up a 1/2" and a 3/4" pieces of (insert your choice of wood that can be stained or painted here" After the glue-up is complete and out of your clamps, I draw a line 3 1/2" parallel from the long edge as a refrence point and then true up an edge with my jointer. If you are using stock from your local big box store, and not rough lumber you can skip that step.
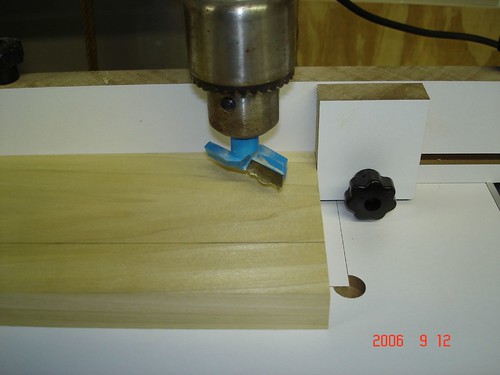
Next step is to set the rosette cutter in your drill press and center the bit with a stop block and rear fence. This really helps when you are making 20 of these at a time. Also a few test runs with the cutter to determine the stop depth of the drill press. It really makes making these a no brainer.

The next step is to mark and cut the board so that you end up with a 3 1/2" x 3 1/2" square section that you can take over to your router table to round over the edges with a round over bit with a bearing on top. Youc an prob use any edge profile you like, but I started with the roundover bit with my first batch of window casing installation.


The next step is to mark and cut the board so that you end up with a 3 1/2" x 3 1/2" square section that you can take over to your router table to round over the edges with a round over bit with a bearing on top. Youc an prob use any edge profile you like, but I started with the roundover bit with my first batch of window casing installation.
Now your rosette is complete for staining or painting. I have a few other pictures of making the rosette on flickr If you want to see them.

posted by brent at 8:14 PM
![]()


0 Comments:
Post a Comment
<< Home